
创建激活环境
创建Conda 环境,这里取Python3.7,因为这是TensorFlow 1.X 的最后支持版本,之后的Python只能用TensorFlow 2.0之后的版本了。2.0 大改,很多老代码用不了。
conda create -n offline python=3.7conda 重新初始化一下。
conda init激活刚刚创建的环境
conda activate offlineTensorFlow 和 Pytorch 安装
输入代码 nvidia-smi,看一下Cuda最高支持到哪里。因为我是租用的云服务器,所以我这里不用安装驱动。安装步骤请参考其他人。
(offline) root@autodl-container-a129119e3c-3de27f6e:~/offline# nvidia-smi
Wed Nov 15 14:50:21 2023
+-----------------------------------------------------------------------------+
| NVIDIA-SMI 515.57       Driver Version: 515.57       CUDA Version: 11.7     |
|-------------------------------+----------------------+----------------------+
| GPU  Name        Persistence-M| Bus-Id        Disp.A | Volatile Uncorr. ECC |
| Fan  Temp  Perf  Pwr:Usage/Cap|         Memory-Usage | GPU-Util  Compute M. |
|                               |                      |               MIG M. |
|===============================+======================+======================|
|   0  NVIDIA GeForce ...  On   | 00000000:57:00.0 Off |                  N/A |
| 49%   28C    P8    30W / 350W |      0MiB / 24576MiB |      0%      Default |
|                               |                      |                  N/A |
+-------------------------------+----------------------+----------------------+

+-----------------------------------------------------------------------------+
| Processes:                                                                  |
|  GPU   GI   CI        PID   Type   Process name                  GPU Memory |
|        ID   ID                                                   Usage      |
|=============================================================================|
|  No running processes found                                                 |
+-----------------------------------------------------------------------------+
TensorFlow
先安装 TensorFlow
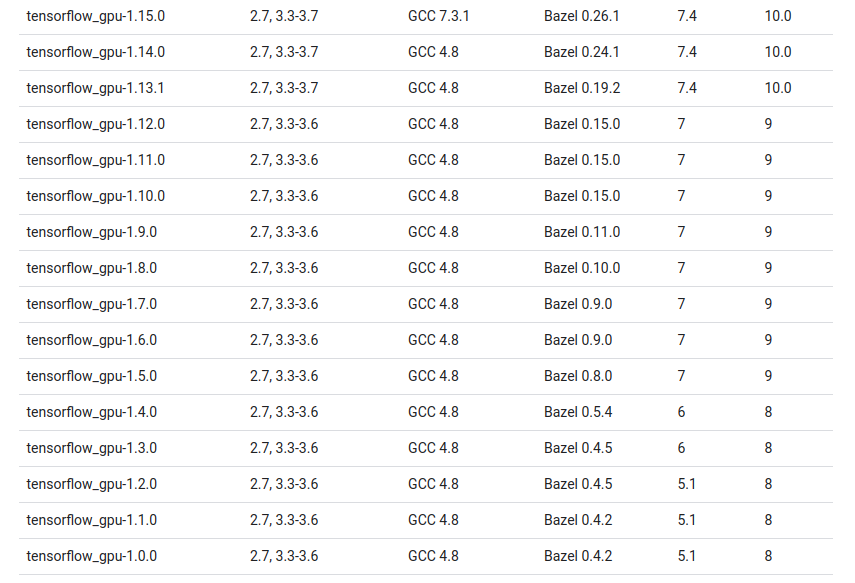
可以在链接这里参考各个版本TensorFlow对应的Cuda版本,还有cuDNN,一般说来最好就按着官方说明装,但是我们后面要装一个较新版本的Pytorch,所以Cuda安装10.2版本的。
先查询查询一下安装没有
# 查询平台内置镜像中的cuda版本
ldconfig -p | grep cuda
# 查询平台内置镜像中的cudnn版本
ldconfig -p | grep cudnn
这里没有安装,不过有没有安装其实无所谓,还是需要自己装。
先搜索一下cudatoolkit有哪些版本。
$ conda search cudatoolkit
Loading channels: done
# Name                       Version           Build  Channel
......
cudatoolkit                  10.2.89      hfd86e86_0  anaconda/pkgs/main
cudatoolkit                  10.2.89      hfd86e86_0  pkgs/main
cudatoolkit                  10.2.89      hfd86e86_1  anaconda/pkgs/main
cudatoolkit                  10.2.89      hfd86e86_1  pkgs/main
cudatoolkit                 11.0.221      h6bb024c_0  anaconda/pkgs/main
cudatoolkit                 11.0.221      h6bb024c_0  pkgs/main
......
安装10.2版本的
conda install cudatoolkit==10.2接下来安装cudnn
conda search cudnn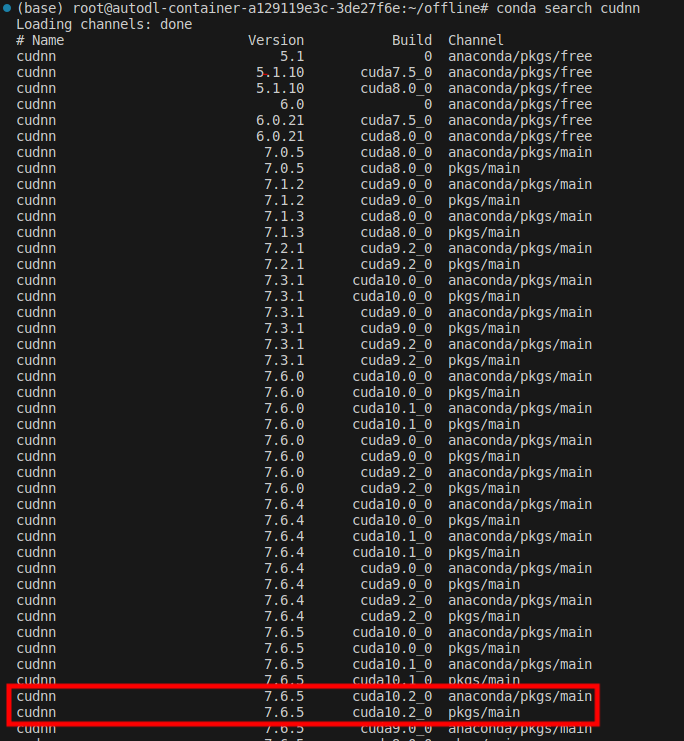
根据build一栏里对应的cuda版本,这里选择7.6.5版本的cudnn。
conda install cudnn==7.6.5然后如果你愿意可以检查一下
conda list | grep cudatoolkit
conda list | grep cudnn
接下来安装1.15版本的tensorflow_gpu
pip install tensorflow_gpu==1.15.5Pytorch
接下来安装Pytorch
在官网查询有
对应安装代码是
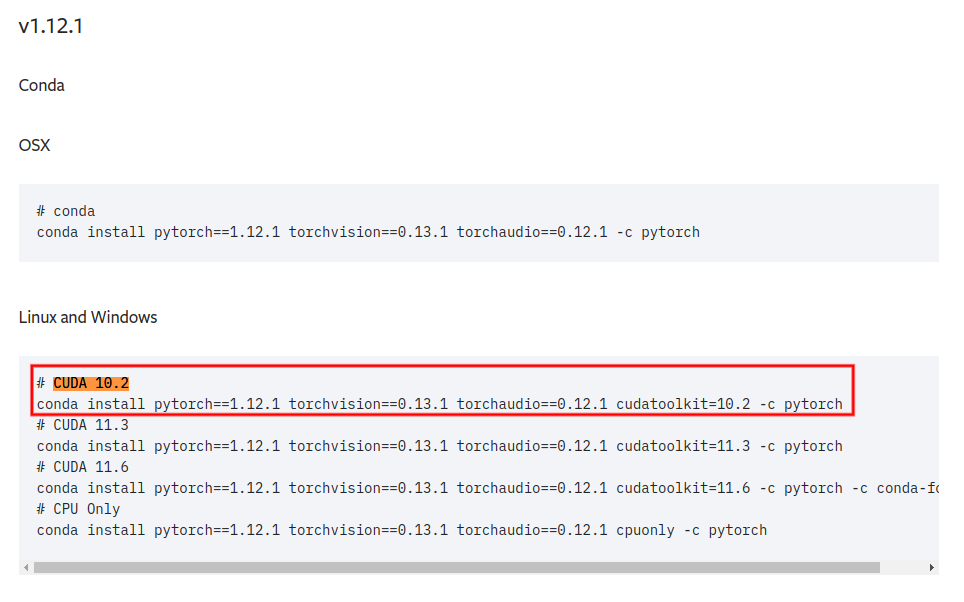
conda install pytorch==1.12.1 torchvision==0.13.1 torchaudio==0.12.1 cudatoolkit=10.2 -c pytorch这是因为 polixir/OfflineRL 用到了 torch.nn.init.trunc_normal_函数。如果前面安装cuda10.0的话,cuda10.0的Pytorch只支持到1.2.0。
在torch.nn.init里查询commit记录,最终定位到2020年5月。
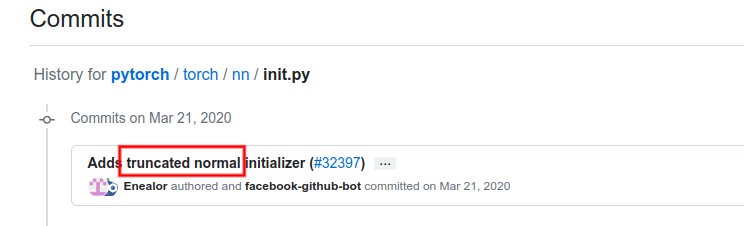
根据日期查询release,那么PyTorch的版本是至少要大于1.5.1的
此时的1.5.1已经支持cuda10.2了,因为随着版本更新,PyTorch对计算性能也有优化,不如一步到位更新到cuda10.2所能支持的最高版本。
Mujoco
先将Mujoco和mujoco-py安装上,这里安装200版本的。
先安装依赖
sudo apt update
sudo apt-get install build-essential libgl1-mesa-dev libglew-dev libsdl2-dev libsdl2-image-dev libglm-dev libfreetype6-dev libglfw3-dev libglfw3 patchelf libosmesa6-dev
然后安装强化学习所需要的一些包。setuptools版本过高安装有些东西会报错,然后cython版本过高也是无法编译mujoco,
pip install setuptools==63.2.0
pip install cython==0.29
pip install swig
pip install mujoco-py==2.0.2.13
这一步会出现错误提示,需要将Mujoco安装到指定位置:
You appear to be missing MuJoCo.  We expected to find the file here:
	/root/.mujoco/mujoco200

This package only provides python bindings, the library must be installed separately.

Please follow the instructions on the README to install MuJoCo
	https://github.com/openai/mujoco-py#install-mujoco

Which can be downloaded from the website
https://www.roboti.us/index.html这里下载Mujoco本体。
这里 下载许可证。其实Openai收购Mujoco后,Gym在某一个版本的更新中就已经不需要Mujoco-py了。直接下载链接
我推荐用FileZilla传文件更快,可以本地先试着配置好了,然后在传到服务器端安装。
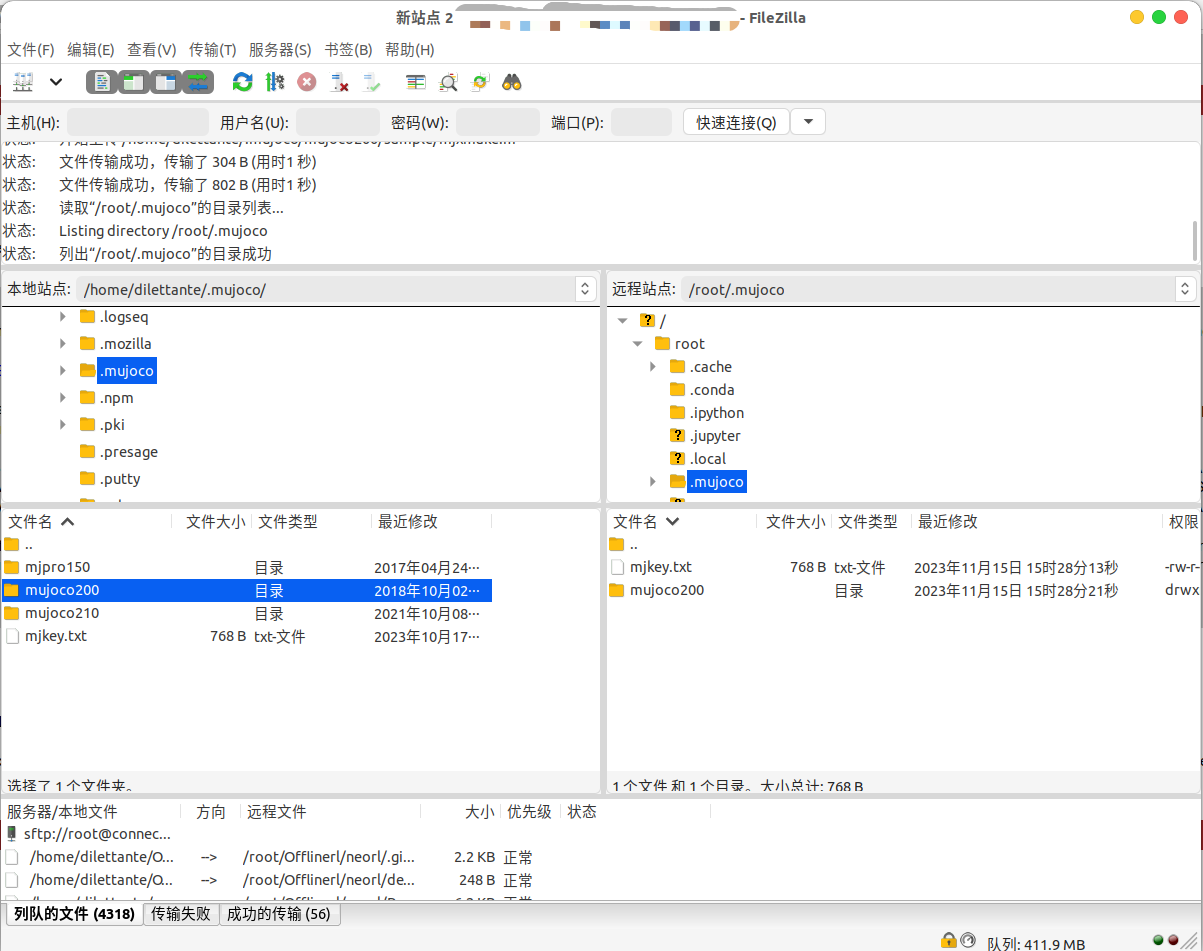
再配置一下环境变量
vim ~/.bashrc在末尾加入:
# Mujoco
export LD_LIBRARY_PATH=$LD_LIBRARY_PATH:/root/.mujoco/mujoco200/bin
export MUJOCO_KEY_PATH=~/.mujoco${MUJOCO_KEY_PATH}
export LD_LIBRARY_PATH=$LD_LIBRARY_PATH:/usr/lib/nvidia
然后输入 :wq(保存并退出),再source ~/.bashrc关闭重启命令行。
pip3 install -r requirements.txt
pip3 install -r requirements.dev.txt
pip install -e .
再执行命令安装
pip install mujoco-py==2.0.2.13
pip install gym==0.19如果mujoco-py无法正常安装(其实很有可能),请在Github的release里,手动下载源码到服务器,然后执行命令
pip install -r requirements.txt
pip install -r requirements.dev.txt
pip3 install -e .这样应该就没问题了。也可以本地试试先满足requirements.dev.txt,之后pip应该可以直接安装了。
D4RL
先安装一些前置包
pip install absl-py
pip install matplotlib先安装mjrl
git clone https://github.com/aravindr93/mjrl.git
cd mjrl
pip install -e .然后再安装d4rl
cd ..
git clone https://github.com/Farama-Foundation/d4rl.git
cd d4rl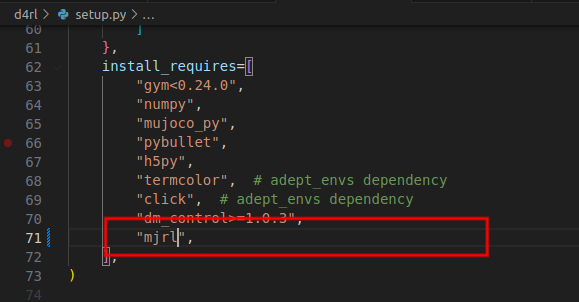
请将mjrl后面那一段删掉,否则不能正常安装。
再执行命令安装
pip install -e .OfflineRL
安装neorl和OfflineRL:
cd ..
git clone https://agit.ai/Polixir/neorl.git
cd neorl
pip install -e .

cd ..
git clone https://github.com/polixir/OfflineRL.git
cd OfflineRL
pip install -e .
请注意,安装OfflineRL前有这三个地方需要修改:
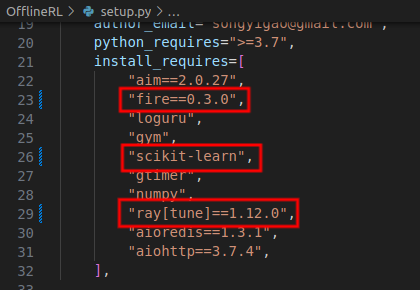
改fire的原因我忘了。
scikit-learn是因为sklearn已经被deprecated了。
ray是因为不改会有socket的问题。
现在试一下运行效果
(offline) root@autodl-container-a129119e3c-3de27f6e:~/offline/OfflineRL# python examples/train_d4rl.py --algo_name=mopo --exp_name=d4rl-halfcheetah-medium-mopo --task d4rl-halfcheetah-medium-v0
Traceback (most recent call last):
......
File "/root/offline/OfflineRL/offlinerl/config/algo/cql_config.py", line 10, in <module>
device = 'cuda'+":"+str(select_free_cuda()) if torch.cuda.is_available() else 'cpu'
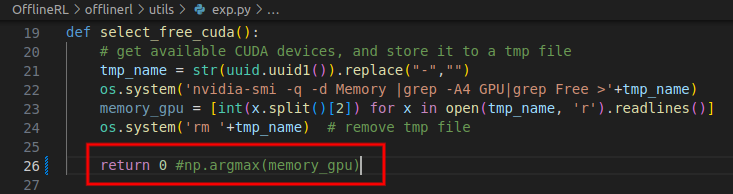
File "/root/offline/OfflineRL/offlinerl/utils/exp.py", line 26, in select_free_cuda
return np.argmax(memory_gpu)
......
ValueError: attempt to get argmax of an empty sequence这个问题可能比较罕见,因为我只有一个GPU我直接简单粗暴的指定为 0 了。
依然是版本问题。我前面没有指定protobuf安装特定版本是因为有一堆冲突的,最后安装它来覆盖。
......
File "/root/miniconda3/envs/offline/lib/python3.7/site-packages/google/protobuf/descriptor.py", line 561, in __new__
    _message.Message._CheckCalledFromGeneratedFile()
TypeError: Descriptors cannot not be created directly.
If this call came from a _pb2.py file, your generated code is out of date and must be regenerated with protoc >= 3.19.0.
If you cannot immediately regenerate your protos, some other possible workarounds are:
 1. Downgrade the protobuf package to 3.20.x or lower.
 2. Set PROTOCOL_BUFFERS_PYTHON_IMPLEMENTATION=python (but this will use pure-Python parsing and will be much slower).

More information: https://developers.google.com/protocol-buffers/docs/news/2022-05-06#python-updates
pip install protobuf==3.19.5再来试试运行效果
(offline) root@autodl-container-a129119e3c-3de27f6e:~/offline/OfflineRL# python examples/train_d4rl.py --algo_name=cql --exp_name=d4rl-halfcheetah-medium-cql --task d4rl-halfcheetah-medium-v0
Warning: Flow failed to import. Set the environment variable D4RL_SUPPRESS_IMPORT_ERROR=1 to suppress this message.
No module named 'flow'
Warning: CARLA failed to import. Set the environment variable D4RL_SUPPRESS_IMPORT_ERROR=1 to suppress this message.
No module named 'carla'
pybullet build time: May 20 2022 19:43:01
2023-11-15 at 17:58:37.381 | INFO | Use cql algorithm!
......
Traceback (most recent call last):
File "examples/train_d4rl.py", line 19, in <module>
fire.Fire(run_algo)
......
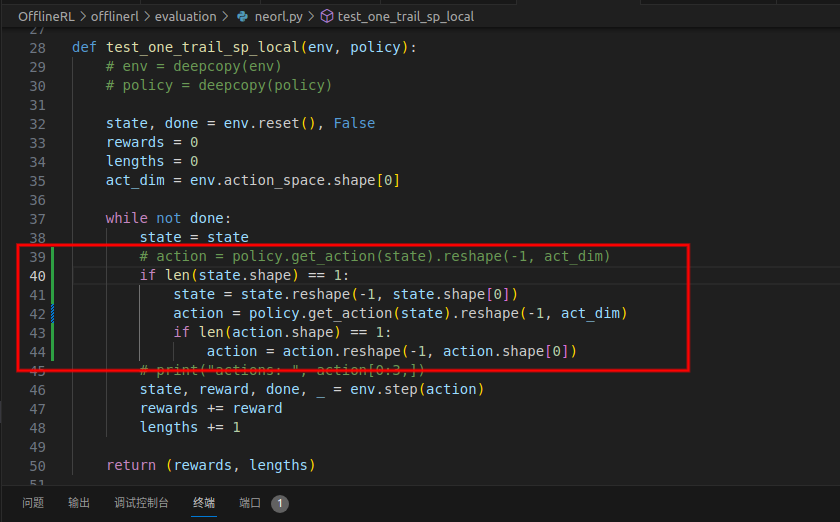
File "/root/offline/OfflineRL/offlinerl/evaluation/neorl.py", line 39, in test_one_trail_sp_local
action = policy.get_action(state).reshape(-1, act_dim)
......
RuntimeError: mat1 and mat2 shapes cannot be multiplied (17x1 and 17x256)同Issue 4,感谢@linhlpv。
同时也可以看见运行时会提示运行提示缺少CARLA和Flow,那是因为这两个库官方文档中给出说明是要额外安装的。
其他问题(尚未解决)
2023-11-15 19:30:18,405 WARNING utils.py:538 -- Detecting docker specified CPUs. In previous versions of Ray, CPU detection in containers was incorrect. Please ensure that Ray has enough CPUs allocated. As a temporary workaround to revert to the prior behavior, set `RAY_USE_MULTIPROCESSING_CPU_COUNT=1` as an env var before starting Ray. Set the env var: `RAY_DISABLE_DOCKER_CPU_WARNING=1` to mute this warning.
2023-11-15 19:30:19,649 WARNING function_runner.py:599 -- Function checkpointing is disabled. This may result in unexpected behavior when using checkpointing features or certain schedulers. To enable, set the train function arguments to be `func(config, checkpoint_dir=None)`.
2023-11-15 19:30:19,655 INFO logger.py:618 -- pip install "ray[tune]" to see TensorBoard files.
2023-11-15 19:30:19,656 WARNING callback.py:126 -- The TensorboardX logger cannot be instantiated because either TensorboardX or one of it's dependencies is not installed. Please make sure you have the latest version of TensorboardX installed: `pip install -U tensorboardx`
2023-11-15 19:34:04,050 INFO utils.py:519 -- Detected RAY_USE_MULTIPROCESSING_CPU_COUNT=1: Using multiprocessing.cpu_count() to detect the number of CPUs. This may be inconsistent when used inside docker. To correctly detect CPUs, unset the env var: `RAY_USE_MULTIPROCESSING_CPU_COUNT`.
2023-11-15 19:34:15,814 WARNING function_runner.py:599 -- Function checkpointing is disabled. This may result in unexpected behavior when using checkpointing features or certain schedulers. To enable, set the train function arguments to be `func(config, checkpoint_dir=None)`.
2023-11-15 19:34:15,823 INFO logger.py:618 -- pip install "ray[tune]" to see TensorBoard files.
2023-11-15 19:34:15,824 WARNING callback.py:126 -- The TensorboardX logger cannot be instantiated because either TensorboardX or one of it's dependencies is not installed. Please make sure you have the latest version of TensorboardX installed: `pip install -U tensorboardx`
2023-11-15 19:34:15,825 WARNING trial_runner.py:288 -- The maximum number of pending trials has been automatically set to the number of available cluster CPUs, which is high (140 CPUs/pending trials). If you're running an experiment with a large number of trials, this could lead to scheduling overhead. In this case, consider setting the `TUNE_MAX_PENDING_TRIALS_PG` environment variable to the desired maximum number of concurrent trials.